Installation and Licensing: Difference between revisions
Scott Munro (talk | contribs) m (1 revision imported) |
md>Scott.Munro |
||
| Line 13: | Line 13: | ||
The following hardware, operating system and software installations (and licenses) are required in order to use Met Dynamics software: | The following hardware, operating system and software installations (and licenses) are required in order to use Met Dynamics software: | ||
* Intel or AMD CPU with AVX2 support (circa 2013+) | * Intel or AMD CPU with AVX2 support (circa 2013+) | ||
* Microsoft Windows 10 or | * Microsoft Windows 10 or later | ||
* Microsoft Office 365 (Excel) | * Microsoft Office 365 (Excel) | ||
* (Optional) | * (Optional) SysCAD Build 139 or later | ||
Administrator rights are not required to install or use Met Dynamics software. | Administrator rights are not required to install or use Met Dynamics software. | ||
=== | === Step One: Obtain the distribution package === | ||
Met Dynamics software is distributed as a ''zip'' archive file. The zip archive contains versions of the software for all available interfaces (e.g. Excel, SysCAD). | Met Dynamics software is distributed as a ''zip'' archive file. The zip archive contains versions of the software for all available interfaces (e.g. Excel, SysCAD). | ||
| Line 25: | Line 25: | ||
To obtain the latest distribution, please contact [mailto:support@metdynamics.com.au support@metdynamics.com.au] | To obtain the latest distribution, please contact [mailto:support@metdynamics.com.au support@metdynamics.com.au] | ||
=== Step | === Step Two: Excel installation === | ||
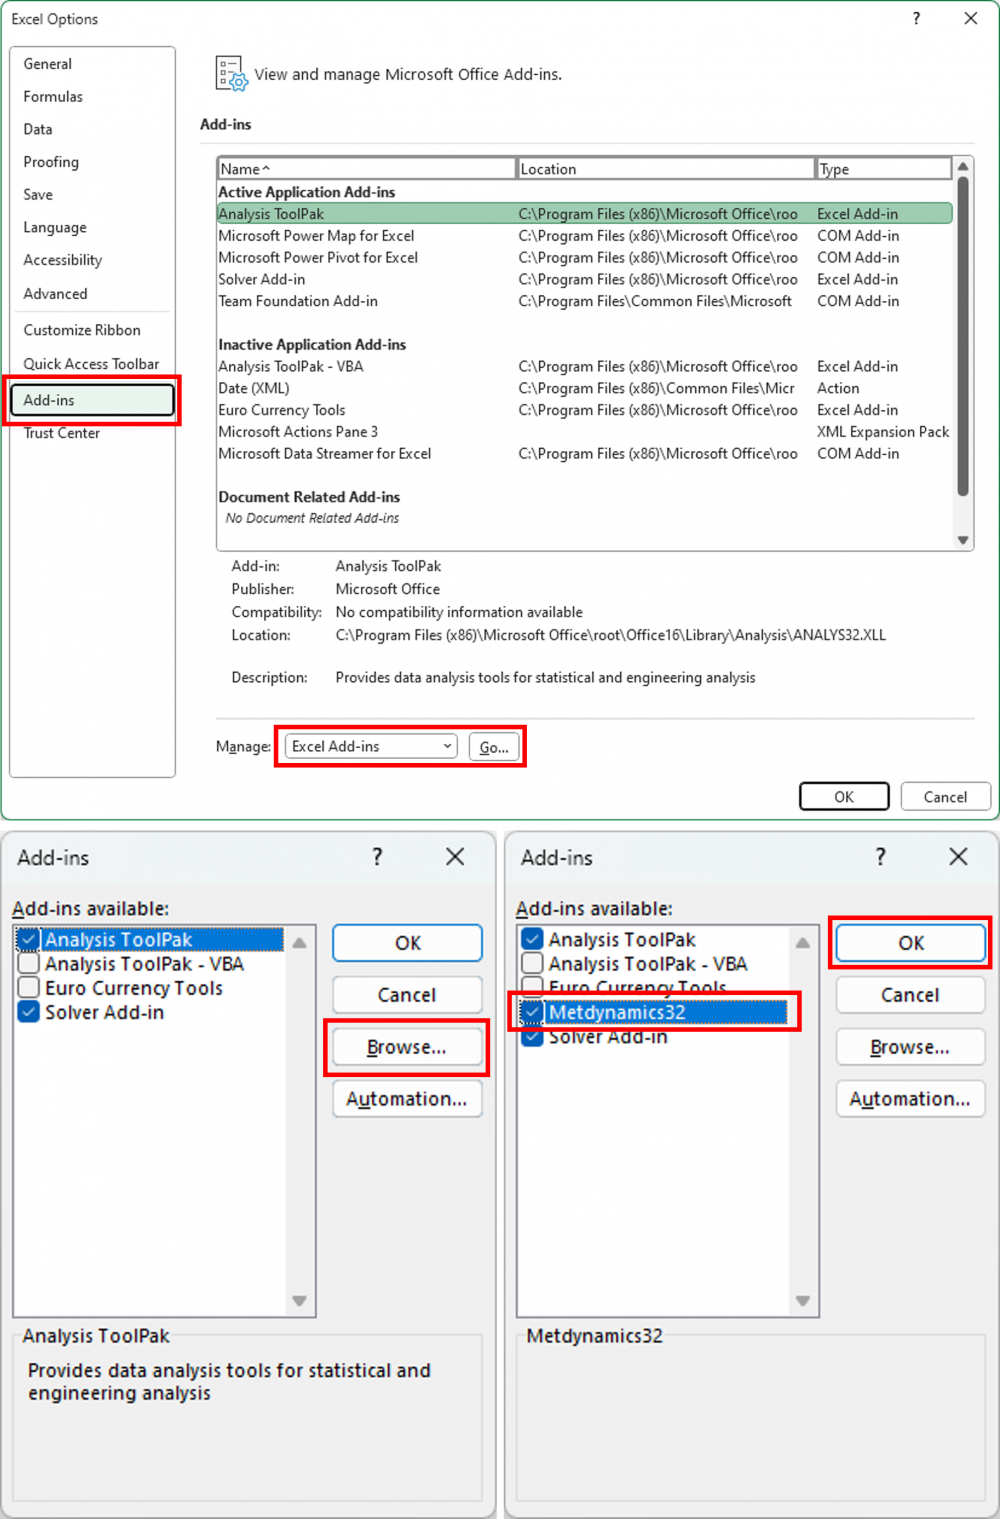
[[File:InstallationAndLicensing1.png|1000px|thumb|Figure 1. Steps to enable the {{Name (Text, Excel, Product Name)}}.]] | |||
Met Dynamics software may be installed for Microsoft Excel by undertaking the following steps: | Met Dynamics software may be installed for Microsoft Excel by undertaking the following steps: | ||
# Unzip the contents of '' | # Unzip the contents of ''{{Name (Text, Distribution, File Name)}}'' into ''{{Name (Text, Distribution, Install Folder)}}'' (recommended) or your preferred folder | ||
# Start Microsoft Excel | # Start Microsoft Excel | ||
# Identify your Excel installation architecture (32 or 64 bit), ''File…Account…About Excel'' | # Identify your Excel installation architecture (32 or 64 bit), ''File…Account…About Excel'' | ||
# Select ''File...Options...Add-Ins'' | # Select ''File...Options...Add-Ins'' | ||
# Ensure ''Manage'' is set to ''Excel Add-Ins'' and click ''Go'' | # Ensure ''Manage'' is set to ''Excel Add-Ins'' and click ''Go'' | ||
# Select ''Browse'' and navigate to your installation path (e.g. '' | # Select ''Browse'' and navigate to your installation path (e.g. ''{{Name (Text, Distribution, Install Folder)}}'') | ||
# For 64 bit versions of Excel (default Office install), select the file ''{{Name (Text | # For 64 bit versions of Excel (default Office install), select the file ''{{Name (Text, Excel, File Name)}}'' and choose ''Ok'' | ||
# For 32 bit versions of Excel, select the file ''{{Name (Text, | # For 32 bit versions of Excel, select the file ''{{Name (Text, Excel, File Name, 32)}}'' and choose ''Ok'' | ||
# Return to the Excel worksheet window | # Return to the Excel worksheet window | ||
# Enter the formula ''=mdLicense()'' in any cell and press Enter | # Enter the formula ''=mdLicense()'' in any cell and press Enter | ||
# Confirm the software license information is displayed and the ''License status'' field is ''LICENSE_OK | # Confirm the software license information is displayed and the ''License status'' field is ''LICENSE_OK'' | ||
# If the software is not licensed, please proceed to the [[Installation and Licensing#Licensing|Licensing]] section below for instructions on obtaining a license. | # If the software is not licensed, please proceed to the [[Installation and Licensing#Licensing|Licensing]] section below for instructions on obtaining a license. | ||
=== Step | === Step Three: SysCAD installation (optional) === | ||
To install the {{Name (Text, SysCAD, Product Name)}}, please use Windows Explorer or a command prompt to undertake the following steps: | |||
# Copy the ''{{Name (Text, SysCAD, File Name)}}'' file from your Met Dynamics software installation path (e.g. ''{{Name (Text, Distribution, Install Folder)}}'') to the SysCAD ''bin'' folder (e.g. ''C:\SysCAD139\bin'') | |||
To install the {{Name (Text, | # Start SysCAD and open an existing project that utilises the {{Name (Text, SysCAD, Product Name)}}, or create a new configuration file and project as described in [[Getting Started]] | ||
# Copy the ''{{Name (Text | # View the ''General Message Log'' in the SysCAD [https://help.syscad.net/Message_Window Message Window] and locate the text section beginning with "{{Name (Text, SysCAD, Product Name)}}..." | ||
# Start SysCAD and open an existing project that utilises the {{Name (Text, | # Confirm the software license information is displayed and the ''License status'' field is ''LICENSE_OK'' on the ''About'' tab or ''General Message Log'' | ||
# View the ''General Message Log'' in the SysCAD [https://help.syscad.net/Message_Window Message Window] and locate the text section beginning with "{{Name (Text, | |||
# Confirm the software license information is displayed and the ''License status'' field is ''LICENSE_OK'' | |||
# If the software is not licensed and the ''License location'' field does not point to a valid license file: | # If the software is not licensed and the ''License location'' field does not point to a valid license file: | ||
## Open the SysCAD Access window for an existing Met Dynamics unit model, or insert a new model if none are present | ## Open the SysCAD Access window for an existing Met Dynamics unit model, or insert a new model if none are present | ||
| Line 58: | Line 58: | ||
# If the software is otherwise not licensed, please proceed to the [[Installation and Licensing#Licensing|Licensing]] section below for instructions on obtaining a license. | # If the software is otherwise not licensed, please proceed to the [[Installation and Licensing#Licensing|Licensing]] section below for instructions on obtaining a license. | ||
'''Note''': The | '''Note''': The {{Name (Text, SysCAD, Product Name)}} is compiled against a specific SysCAD Build version, as noted in the [[Revision History]]. As such, SysCAD projects utilising {{Name (Text, Product Name)}} may cease to load if the SysCAD version is upgraded without the corresponding version of ''{{Name (Text, SysCAD, File Name)}}''. | ||
== Licensing == | == Licensing == | ||
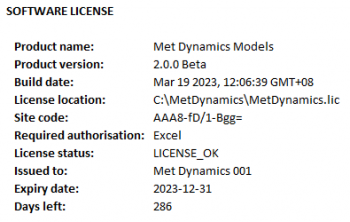
[[File:InstallationAndLicensing2.png|350px|thumb|Figure 2. Example {{Name (Text, Product Name)}} license information shown in Microsoft Excel.]] | |||
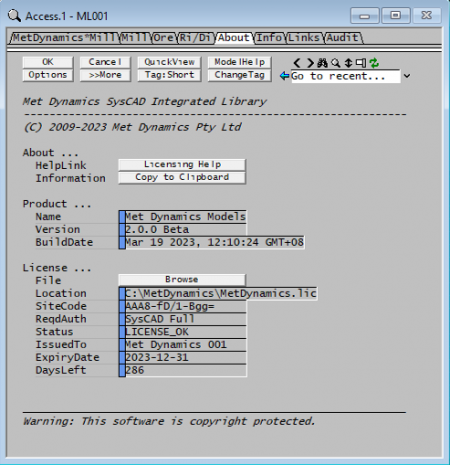
[[File:InstallationAndLicensing3.png|450px|thumb|Figure 3. Example {{Name (Text, Product Name)}} license information shown in SysCAD.]] | |||
Licenses to use Met Dynamics software are provided on a 'per seat' basis. | Licenses to use Met Dynamics software are provided on a 'per seat' basis. | ||
| Line 75: | Line 79: | ||
# ''Paste'' the Site Code character string into the body of a new email message | # ''Paste'' the Site Code character string into the body of a new email message | ||
# Include your contact details and a message requesting a license issue in the email | # Include your contact details and a message requesting a license issue in the email | ||
# Send the email to the Met Dynamics | # Send the email to the Met Dynamics Accounts team at [mailto:accounts@metdynamics.com.au accounts@metdynamics.com.au] | ||
# After the license request has been received, Met Dynamics will generate a license file and return it to the sender's email address | # After the license request has been received, Met Dynamics will generate a license file and return it to the sender's email address | ||
# Place a copy of the returned license file (e.g. '' | # Place a copy of the returned license file (e.g. ''{{Name (Text, Company Name)|nospace=1}}.lic'') in the {{Name (Text, Product Name)}} installation path (e.g. ''{{Name (Text, Distribution, Install Folder)}}'') | ||
# Start Microsoft Excel | # Start Microsoft Excel | ||
# Enter the ''=mdLicense()'' function in any cell and confirm the ''License status'' field now reports ''LICENSE_OK'' | # Enter the ''=mdLicense()'' function in any cell and confirm the ''License status'' field now reports ''LICENSE_OK'' | ||
| Line 106: | Line 110: | ||
# Select ''File...Options...Add-Ins'' | # Select ''File...Options...Add-Ins'' | ||
# Ensure ''Manage'' is set to ''Excel Add-Ins'' and click ''Go'' | # Ensure ''Manage'' is set to ''Excel Add-Ins'' and click ''Go'' | ||
# Unselect the ''{{Name (Text | # Unselect the ''{{Name (Text, Excel, File Name)}}'' or ''{{Name (Text, Excel, File Name, 32)}}'' checkbox and choose ''OK'' | ||
# Close Microsoft Excel | # Close Microsoft Excel | ||
# Delete the installation folder, e.g. '' | # Delete the installation folder, e.g. ''{{Name (Text, Distribution, Install Folder)}}'', and all contents | ||
# Return to ''Excel Add-Ins'' via steps 1 - 3 | # Return to ''Excel Add-Ins'' via steps 1 - 3 | ||
# Click on '' | # Click on ''{{Name (Text, Excel, File Name)}}'' or ''{{Name (Text, Excel, File Name, 32)}}'' and select ''OK'' when prompted to "Delete from list" | ||
# Close Microsoft Excel | # Close Microsoft Excel | ||
=== SysCAD uninstallation === | === SysCAD uninstallation === | ||
While the SysCAD application is closed: | While the SysCAD application is closed: | ||
# Delete the ''{{Name (Text | # Delete the ''{{Name (Text, SysCAD, File Name)}}'' file from the SysCAD ''bin'' folder (e.g. ''C:\SysCAD139\bin'') | ||
'''Note''': SysCAD projects that include models from the {{Name (Text, | '''Note''': SysCAD projects that include models from the {{Name (Text, SysCAD, Product Name)}} will no longer load if the ''{{Name (Text, SysCAD, File Name)}}'' file is removed. | ||
== Further support == | == Further support == | ||
If any step of the installation or licensing procedures fails, please contact [mailto:support@metdynamics.com.au support@metdynamics.com.au] for assistance. | If any step of the installation or licensing procedures fails, please contact [mailto:support@metdynamics.com.au support@metdynamics.com.au] for assistance. | ||
Revision as of 06:34, 19 March 2023
Introduction
This article describes the procedures for installing and licensing Met Dynamics software on client PCs.
Installation
Met Dynamics software may be installed by following the procedures provided in this section:
- Manual installation steps are provided in lieu of an installer program, which may be restricted in some security environments.
- Some basic knowledge of file manipulation in Microsoft Windows is required to complete the installation.
System requirements
The following hardware, operating system and software installations (and licenses) are required in order to use Met Dynamics software:
- Intel or AMD CPU with AVX2 support (circa 2013+)
- Microsoft Windows 10 or later
- Microsoft Office 365 (Excel)
- (Optional) SysCAD Build 139 or later
Administrator rights are not required to install or use Met Dynamics software.
Step One: Obtain the distribution package
Met Dynamics software is distributed as a zip archive file. The zip archive contains versions of the software for all available interfaces (e.g. Excel, SysCAD).
To obtain the latest distribution, please contact support@metdynamics.com.au
Step Two: Excel installation
Met Dynamics software may be installed for Microsoft Excel by undertaking the following steps:
- Unzip the contents of MetDynamics-2.1.0.zip into C:\Met Dynamics (recommended) or your preferred folder
- Start Microsoft Excel
- Identify your Excel installation architecture (32 or 64 bit), File…Account…About Excel
- Select File...Options...Add-Ins
- Ensure Manage is set to Excel Add-Ins and click Go
- Select Browse and navigate to your installation path (e.g. C:\Met Dynamics)
- For 64 bit versions of Excel (default Office install), select the file MetDynamics.xll and choose Ok
- For 32 bit versions of Excel, select the file MetDynamics32.xll and choose Ok
- Return to the Excel worksheet window
- Enter the formula =mdLicense() in any cell and press Enter
- Confirm the software license information is displayed and the License status field is LICENSE_OK
- If the software is not licensed, please proceed to the Licensing section below for instructions on obtaining a license.
Step Three: SysCAD installation (optional)
To install the Met Dynamics Models SysCAD Add-On, please use Windows Explorer or a command prompt to undertake the following steps:
- Copy the MetDynamics.dll file from your Met Dynamics software installation path (e.g. C:\Met Dynamics) to the SysCAD bin folder (e.g. C:\SysCAD139\bin)
- Start SysCAD and open an existing project that utilises the Met Dynamics Models SysCAD Add-On, or create a new configuration file and project as described in Getting Started
- View the General Message Log in the SysCAD Message Window and locate the text section beginning with "Met Dynamics Models SysCAD Add-On..."
- Confirm the software license information is displayed and the License status field is LICENSE_OK on the About tab or General Message Log
- If the software is not licensed and the License location field does not point to a valid license file:
- Open the SysCAD Access window for an existing Met Dynamics unit model, or insert a new model if none are present
- Click on the About tab
- Click the Browse button and use the file explorer to select a valid license file
- Confirm the software license information is displayed and the License status field is LICENSE_OK
- If the General Message Log reports "WARNING: SysCAD Runtime license or /rt command line argument required for Met Dynamics 'SysCAD Runtime' license level", then the Met Dynamics software is licensed for runtime use only. Please obtain a runtime license for SysCAD or start the SysCAD application in runtime mode
- If the software is otherwise not licensed, please proceed to the Licensing section below for instructions on obtaining a license.
Note: The Met Dynamics Models SysCAD Add-On is compiled against a specific SysCAD Build version, as noted in the Revision History. As such, SysCAD projects utilising Met Dynamics Models may cease to load if the SysCAD version is upgraded without the corresponding version of MetDynamics.dll.
Licensing
Licenses to use Met Dynamics software are provided on a 'per seat' basis.
A granted license is locked to the unique hardware identifier of an individual client PC.
Obtaining a license
The steps below outline the procedure for obtaining a license for Met Dynamics software:
- Install Met Dynamics software for Microsoft Excel, as described above
- Start Microsoft Excel
- Enter the formula =mdLicense() in any cell and press Enter
- Copy the string of characters displayed next to the Site Code field to the Windows clipboard
- Close Microsoft Excel
- Paste the Site Code character string into the body of a new email message
- Include your contact details and a message requesting a license issue in the email
- Send the email to the Met Dynamics Accounts team at accounts@metdynamics.com.au
- After the license request has been received, Met Dynamics will generate a license file and return it to the sender's email address
- Place a copy of the returned license file (e.g. MetDynamics.lic) in the Met Dynamics Models installation path (e.g. C:\Met Dynamics)
- Start Microsoft Excel
- Enter the =mdLicense() function in any cell and confirm the License status field now reports LICENSE_OK
Alternatively, the Site code character string may be obtained from the SysCAD application General Message Log or unit model Access window About tab, as described in the SysCAD installation section above.
Trial license
A Trial License for Met Dynamics software is available upon request:
- A 30 day trial period is typically offered
- Trial licenses are not locked to client PC hardware identifiers, and software functionality is not in any way restricted during the trial period
- The software will cease to function after the expiration of the trial period
Please contact support@metdynamics.com.au to request a trial license.
Expired licenses
Expired client or trial licenses limit software functionality in the following ways:
- Excel functions cease to operate and return the #License error message in place of results
- SysCAD projects will continue to load and unit models may be inspected. However, the project will not Solve/Run if the On field of any Met Dynamics unit model in the project is checked.
Uninstallation
Met Dynamics software may be removed from your system by following the instructions below.
Excel uninstallation
- Start Microsoft Excel
- Select File...Options...Add-Ins
- Ensure Manage is set to Excel Add-Ins and click Go
- Unselect the MetDynamics.xll or MetDynamics32.xll checkbox and choose OK
- Close Microsoft Excel
- Delete the installation folder, e.g. C:\Met Dynamics, and all contents
- Return to Excel Add-Ins via steps 1 - 3
- Click on MetDynamics.xll or MetDynamics32.xll and select OK when prompted to "Delete from list"
- Close Microsoft Excel
SysCAD uninstallation
While the SysCAD application is closed:
- Delete the MetDynamics.dll file from the SysCAD bin folder (e.g. C:\SysCAD139\bin)
Note: SysCAD projects that include models from the Met Dynamics Models SysCAD Add-On will no longer load if the MetDynamics.dll file is removed.
Further support
If any step of the installation or licensing procedures fails, please contact support@metdynamics.com.au for assistance.


